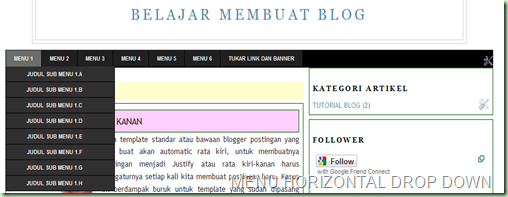
MENU HORIZONTAL DROPDOWN SUB MENU

بِسْــــــــــــــــمِ اﷲِالرَّحْمَنِ اارَّحِيم

Posted by Unknown Jumat, 17 Agustus 2012 0 komentar
MENU HORIZONTAL DROPDOWN SUB MENU | Cara Membuat Horizontal Dropdown Sub Menu | Trik html dan css menu horisontal.
MENU HORIZONTAL DROPDOWN SUB MENU
MENU HORIZONTAL DROPDOWN SUB MENU.
NB: tutorial ini sudah menggunakan editor baru blogger
Login ke bloger
rancangan
edit html
cari kode ]]></b:skin>
letakkan kode di bawah ini sebelum ]]></b:skin>
/* navbar
================== */
#bg_nav {
background: #000000;
width: 900px;                                                    /* ukuran lebar menu============ */ height: 23px;
font-size: 10px;
font-family: Arial, Tahoma, Verdana;
color: #FFFFFF;
font-weight: bold;
margin: 0px AUTO 0px;
padding-BOTTOM: 5px;
border-top: 1px solid #333333;
border-bottom: 1px solid #333333;
overflow: hidden;
}
#bg_nav a, #bg_nav a:visited {
color: #FFFFFF;
font-size: 9px;
text-decoration: none;
text-transform: uppercase;
padding: 0px 0px 0px 3px;
}
#bg_nav a:hover {
color: #FFFFFF;
text-decoration: underline;
padding: 0px 0px 0px 3px;
}
#navleft {
width: 990px;
float: left;
margin: 0px;
padding: 0px;
}
#nav {
margin: 0px;
padding: 0px;
list-style: none;
}
#nav ul {
margin: 0px;
padding: 0px;
list-style: none;
}
#nav a, #nav a:visited {
background: #222222;
color: #FFFFFF;
display: block;
font-weight: bold;
margin: 0px;
padding: 8px 15px 8px 15px;
border-left: 1px solid #000000
}
#nav a:hover {
background: #6e6d6d;
color: #FFFFFF;
margin: 0px;
padding: 8px 15px 8px 15px;
text-decoration: none;
}
#nav li {
float: left;
margin: 0px;
padding: 0px;
}
#nav li li {
float: left;
margin: 0px;
padding: 0px;
width: 150px;
}
#nav li li a, #nav li li a:link, #nav li li a:visited {
background: #333333;
width: 160px;
float: none;
margin: 0px;
padding: 7px 30px 7px 10px;
border-bottom: 1px solid #000000;
border-left: 1px solid #000000;
border-right: 1px solid #000000;
}
#nav li li a:hover, #nav li li a:active {
background: #666666;
padding: 7px 30px 7px 10px;
}
#nav li ul {
position: absolute;
width: 10em;
left: -999em;
}
#nav li:hover ul {
left: auto;
display: block;
}
#nav li:hover ul, #nav li.sfhover ul {
left: auto;
}
setelah itu simpan template dan lanjutkan tahap kedua
Langsung menuju ELEMENT HALAMAN, lalu TAMBAH GADGET pilih HTML/javascript
langsunga aja copy paste code di bawah ini
/* http://cintafido.blogspot.com
================== */
<div id='bg_nav'>
<div id='navleft'>
<div id='nav'>
<ul>
   <li><a href='##'>MENU 1</a>
      <ul>
         <li><a href='http://cintafido.blogspot.com'>JUDUL SUB MENU 1.A</a></li>
         <li><a href='http://cintafido.blogspot.com'>JUDUL SUB MENU 1.B</a></li>
         <li><a href='http://cintafido.blogspot.com'>JUDUL SUB MENU 1.C</a></li>
         <li><a href='http://cintafido.blogspot.com'>JUDUL SUB MENU 1.D</a></li>
         <li><a href='http://cintafido.blogspot.com'>JUDUL SUB MENU 1.E</a></li>
         <li><a href='http://cintafido.blogspot.com'>JUDUL SUB MENU 1.F</a></li>
         <li><a href='http://cintafido.blogspot.com'>JUDUL SUB MENU 1.G</a></li>
         <li><a href='http://cintafido.blogspot.com'>JUDUL SUB MENU 1.H</a></li>
      </ul>
   </li>
   <li><a href='#'>MENU 2</a>
      <ul>
         <li><a href='http://cintafido.blogspot.com'>JUDUL SUB MENU 2.A</a></li>
         <li><a href='http://cintafido.blogspot.com'>JUDUL SUB MENU 2.B</a></li>
         <li><a href='http://cintafido.blogspot.com'>JUDUL SUB MENU 2.C</a></li>
         <li><a href='http://cintafido.blogspot.com'>JUDUL SUB MENU 2.D</a></li>
      </ul>
   </li>
   <li><a href='#'>MENU 3</a>
      <ul>
         <li><a href='http://cintafido.blogspot.com'>JUDUL SUB MENU 3.A</a></li>
         <li><a href='http://cintafido.blogspot.com'>JUDUL SUB MENU 3.B</a></li>
         <li><a href='http://cintafido.blogspot.com'>JUDUL SUB MENU 3.C</a></li>
         <li><a href='http://cintafido.blogspot.com'>JUDUL SUB MENU 3.D</a></li>
      </ul>
   </li>
   <li><a href='#'>MENU 4</a>
      <ul>
         <li><a href='http://cintafido.blogspot.com'>JUDUL SUB MENU 4.A</a></li>
         <li><a href='http://cintafido.blogspot.com'>JUDUL SUB MENU 4.B</a></li>
         <li><a href='http://cintafido.blogspot.com'>JUDUL SUB MENU 4.C</a></li>
         <li><a href='http://cintafido.blogspot.com'>JUDUL SUB MENU 4.D</a></li>
      </ul>
   </li>
   <li><a href='#'>MENU 5</a>
      <ul>
         <li><a href='http://cintafido.blogspot.com'>JUDUL SUB MENU 5.A</a></li>
         <li><a href='http://cintafido.blogspot.com'>JUDUL SUB MENU 5.B</a></li>
         <li><a href='http://cintafido.blogspot.com'>JUDUL SUB MENU 5.C</a></li>
         <li><a href='http://cintafido.blogspot.com'>JUDUL SUB MENU 5.D</a></li>
      </ul>
   </li>
   <li><a href='#'>MENU 6</a>
      <ul>
         <li><a href='http://cintafido.blogspot.com'>JUDUL SUB MENU 6.A</a></li>
         <li><a href='http://cintafido.blogspot.com'>JUDUL SUB MENU 6.B</a></li>
         <li><a href='http://cintafido.blogspot.com'>JUDUL SUB MENU 6.C</a></li>
         <li><a href='http://cintafido.blogspot.com'>JUDUL SUB MENU 6.D</a></li>
      </li></ul>
   </li>
   <li><a href='http://cintafido.blogspot.com/2012/08/menu-horizontal-dropdown-sub-menu.html'>TUKAR LINK DAN BANNER</a>
</li></ul>
</div>
</div></div>

artikel cinta fido postingan ini tentang MENU HORIZONTAL DROPDOWN SUB MENU


Baca Selengkapnya ....
Cara mencuci sarang walet

بِسْــــــــــــــــمِ اﷲِالرَّحْمَنِ اارَّحِيم

Posted by Unknown 0 komentar
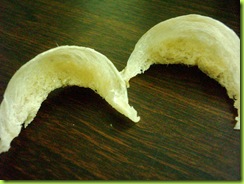
Cara mencuci sarang walet | Trik agar Sarang Walet Jadi Putih | Tips Membuat Sarang Walet makin Mahal | Bikin Harga Sarang Lebih Mahal.

PERALATAN

    Cara mencuci sarang walet
  1. Pinset
  2. Bak air
  3. Kuas kecil (sikat gigi)
  4. Alat pemotong (gunting,cutter)Meja kerja
  5. Lampu gantung
  6. Saringan limbah
  7. Keranjang sampah
  8. Kipas angin (pengering)
  9. Handuk kecil
SARANA PENDUKUNG

a)Untuk sarang rumahan
  1. Cairan pembersih – SUPERNOL (bila sarang tidak terlalu kotor/kuat melekat)
  2. SUPER WHITE – (bila sarang terlalu kotor/kotoran terlalu kuat melekat)
  • Kegunaan: membantu mengembangkan sarang sehingga bulu-bulu yang melekat akan mudah lepas saat dibersihkan
b)untuk sarang gua
  1. Cairan BNC (bila sarang tidak terlalu kotor/kuat melekat)
  2. Cairan PSG (bila sarang terlalu kotor/kotoran terlalu kuat melekat)
Apabila sarang terkontaminasi oleh jamur, sebaiknya dicuci dengan bahan kimia h2o2, tetapi penggunaan bahan kimia ini tidak baik untuk kesehatan, bila dapat, dihindari penggunaan bahan kimia tersebut
PROSES PENCUCIAN
  1. Siapkan semua peralatan. Masukkan sarang walet ke dalam baskom, lalu tuangkan air bersih untuk merendam
  2. Bersihkan dengan sikat secara perlahan-lahan sampai kotoran yang melekat hilang
  3. Potong bagian kaki jika terlalu besar danjuga bagian perut yang terlalu tebal harus dikeluarkan lebih dulu.
  4. Angkat dan celupkan kembali ke baskom lain sambil disikat lagi secara perlahan-lahan sekali lagi sampai benar-benar bersih
  5. Setelah itu angkat kembali dan masukkan ke baskom lain rendam sampai kotorn yang menempel larut ke dalam air
  6. Setelah itu keringkan dengan handuk kain yang lembut agar airnya terserap hingga terasa lebih kering supaya tidak merusak kualitas sarang.
  7. Diamkan sarang beberapa saat agar air meresap untuk mempermudah saat proses pencabutan bulu dan kotoran.
  8. Bersihkan dengan cara mencabut bulu yang menempel di dinding atau bantalan sarang dengan memakai pinset
  9. Bilas dengan cara memasukkan sarang kedalam baskom berisi air bersih untuk membuang sisa kotoran
  10. Angkat sarang, lalu letakkan didalam cetakan lalu jepit dan digantung untuk dikeringkan, anginkan dengan kipas angin selama 24 jam di dalam ruangan dengan pendingin, pengeringan juga bias menggunakan mesin pengeringan
  11. Setelah kering masukkan sarang ke toples/tempat penyimpanan

Menghilangkan warna keruh

  1. Salah satu bagian untuk meningkatkan kualitas sarang burung wallet yaitu: menghilangkan warna keruh atau coklat menjadi putih bersih. Proses ini dimulai dari perendaman sarang ke dalam air bersih selama beberapa jam. Air rendaman dibuang lalu ditambah minyak goreng, kemudian diaduk selama kira-kira 15 menit. Pada proses ini bulu-bulu akan terpisah dari sarang, lalu di keringkan dengan mesin pengering, atau bisa juga menggunakan pengering rambut. sesudah itu sarang akan terlihat lebih bersih.
  2. Pada proses selanjutnya yaitu pemutihan sarang.sarang direndam dalam larutan hydrogen peroksida (h2o2) dengan konsentrasi 3% selama beberapa menit. Lalu sarang dibilas dengan air bersih beberapa kali, kemudian keringkan dengan mesin pengering, penggunaan larutan ini akan menghasilkan sarang yang berwarna putih kusam. Yang perlu di perhatikan adalah dosis penggunaan larutan ini karena dapat merugikan kesehatan

Menambal sarang retak atau berlubang

Sarang rusak berlubang atau retak dapat terjadi pada saat pencucian, pembersihan dari kutu-kutu busuk atu berlubang-lubang karena dimakan kecoak, kondisi tersebut dapat mengakibat kan penurunan kwalitas sarang burung tersebut.untuk mengatasi hal tersebut diperlukan proses penambalan sarang tersebut. Cara penambalan sebagai berikut:
  • Bersihkan sarang dari kotoran atau bulu lalu ambil sarang hancuran yang sudah direndam untuk menambal sarang yang retak dan berlubang, dalam proses penambalan yang perlu di perhatikan adalah warna lajur atau ukuran sarang disesuaikan dengan sarang yang retak atau berlubang, dengan demikian bekas tambalan akan tersamarkan, setelah itu sarang bisa langsung dicetak sesuai cetakan aslinya
  • Untuk menambal sarang ini bisa digunakan lem super77 yang food grade agar aman dikonsumsi dan bias larut saat dimasak.
  • Lalu dikeringkan dengan mesin pengering

Mencetak sarang hancuran

Sarang hancuran dihasilkan dari kumpulan sisa-sisa sarang yang rusak. Hal ini bisa terjadi saat proses pembersihan dan pencucian atau diakibatkan kutu dan kecoak yang berakibat penurunan kualitas dan nilai jual. Untuk itu diperlukan proses cetak kembali hingga menyerupai sarang asli
Mencetak sarang hancuran membutuhkan kreatifitas dan seni


Cara mencuci sarang walet

artikel cinta fido ini tentang Cara mencuci sarang walet


sumber : http://earning-news.blogspot.com/2010/04/cara-mencuci-sarang-walet.html

Baca Selengkapnya ....

Cara memasang File.swf pada Entri / postingan blog

بِسْــــــــــــــــمِ اﷲِالرَّحْمَنِ اارَّحِيم

Posted by Unknown 0 komentar
Cara memasang File.swf pada Entri / postingan blog | Trik mempercantik dengan file animasi | Menghias website / blogger dengan flash .swf atau juga bisa .gif | Tips membuat blog semakin Indah dan Keren dengan gambar gerak.
Cara memasang File.swf pada Entri / postingan blog

Kamu pernah mengalami error ketika Pasang file ini di blog kamu..??
sebenarnya tidak terlalu sulit untuk menghiasi blog dengan file animasi seperti .gif, .swf, atau lainnya hanya saja kita harus mempunyai file yang sudah berbentuk .swf, cara membuat terserah yang pasti kalo saya sie pake Flash, meski masih belajar tapi untuk sekedar animasi yang biasa2 sie bisa hehe.

langsung saja caranya :

1. pastikan anda sudah mempunyai file.swf

2. upload file.swf tersebut di beberapa hosting gratisan berikut ini:

* http://www.swfcabin.com
* http://megaswf.com
* http://www.swfupload.com
* http://up2share.com
* http://geocities.yahoo.com
* http://www.000webhost.com

Untuk : http://up2share.com, coz uploadnya mudah, simpel (tapi terserah anda)
3. setelah selesai copy kode hasil upload tersebut
4. kemudian masuk ke Blogger account anda
5. layout > page elements > add a gadget >
6. pilih : HTML/JavaScript Add
7. lalu kopy kode berikut :

<div style="text-align: center;">
<embed pluginspage="http://www.macromedia.com/shockwave/download/index.cgi?

P1_Prod_Version=ShockwaveFlash" width="550"

src="http://file-swf-kamu.swf" height="100" bgcolor="white"

type="application/x-shockwave-flash" quality="high"></embed>

</div>


8. ganti : http://file-swf-kamu.swf dengan file kode swf kamu yang tadi dikopi

9. setelah itu simpan

10 selesai

Bila anda berhasil menghiasi Blog/website, jangan lupa ucapkan alhamdulillah..
anda telah membaca postingan tentang Cara memasang File.swf pada Entri / postingan blog

Baca Selengkapnya ....

tutorial dasar sound flash AS3

بِسْــــــــــــــــمِ اﷲِالرَّحْمَنِ اارَّحِيم

Posted by Unknown Sabtu, 11 Agustus 2012 0 komentar
In this lesson, we're going to learn how to control sound in Flash using ActionScript 3. We're going to learn how to load external sound files into our Flash movie, as well as how to play and stop the sound's playback.

Exercise files accompany this article. Please make sure to save them both inside the same folder.

Let's begin.

You can use the AS3 Sound class to control the sound in your Flash movie using code. The AS3 Sound class can be used to:
  • load an external sound file into a Flash movie
  • start the playback of a loaded sound file
NOTE: You can NOT use the Sound class to stop playing sound. It does not have a method for that. If you want to stop a sound's playback, you'll have to use a different class - the AS3 SoundChannel class - which we will talk about later.

Open the Sound.fla file. You'll see that there are two buttons on the stage - play_btn and stop_btn. But let's ignore those buttons for now. First, let's write some code that will load and play the sound right away. Select frame 1 of the Actions layer, then go to the Actions Panel and type in the following lines:
var mySound:Sound = new Sound();
var myURL:URLRequest = new URLRequest("CheerfulSong.mp3");
The first line (var mySound:Sound = new Sound();) creates an instance of the Sound class. I've named it mySound. We will use this to load and play the external sound file named CheerfulSong.mp3.

The second line (var myURL:URLRequest = new URLRequest("CheerfulSong.mp3");) creates a URLRequest object. This is used to specify the path to the external file that we want to load.

So now what we've created those two objects, we can now load the external sound file. Use the load() method of the Sound class and pass to it the URLRequest object:

Sound.load(URLRequest);

So in our example, we would write:

mySound.load(myURL);

This instructs our mySound object to load the file specified in myURL (which is CheerfulSong.mp3).
var mySound:Sound = new Sound();
var myURL:URLRequest = new URLRequest("CheerfulSong.mp3");

mySound.load(myURL);

NOTE: If you want to load more than one sound file, then create another Sound object for each succeeding sound file that you'd like to load.

If you test the movie at this point, you won't hear the sound just yet. That's because we just told Flash to load the sound. We haven't given the instruction to start playing the sound yet. To make the sound start playing, we use the play() method of the Sound class:
var mySound:Sound = new Sound();
var myURL:URLRequest = new URLRequest("CheerfulSong.mp3");

mySound.load(myURL);
mySound.play();
So if you test the movie now, you should hear the sound playing.

The play() method of the Sound class has 2 optional parameters:
  1. startTime - this lets you specify the point (in milliseconds) where the sound playback should start
  2. loops - this lets you specify how many times the sound should repeat playback
For example, lets pass values to these 2 parameters like so:

mySound.play(25000, 2);

The first value refers to the startTime parameter. Here, we've specified a value of 25000 milliseconds (or 25 seconds). This means that when the sound begins playing, it will start playing at the sound's 25-second mark, instead of starting at the beginning. So it will skip the first 24 seconds of the song when the playback starts.

The second value refers to the loops parameter. We've specified a value of 2. This means that the sound will play 2 times. When it plays the first time and then reaches the end, it will loop back to the startTime and play one more time.

Test the movie in order to verify, and then change the play statement back to mySound.play(); (without any parameters), and let's continue.

If we want the sound to play only after the play button (named play_btn) has been clicked, then we'll have to create a mouse click event listener for the play button, and we'll transfer the play sound statement inside that event listener:
var mySound:Sound = new Sound();
var myURL:URLRequest = new URLRequest("CheerfulSong.mp3");

mySound.load(myURL);
// Make sure that you remove the play sound statement
// that was here, and transfer it into the mouse click
// event listener function

play_btn.addEventListener(MouseEvent.CLICK, playSound);

function playSound(e:MouseEvent):void
{
     mySound.play();
}
Here, we've created a mouse click event listener function named playSound, and we've transferred the mySound.play(); statement into that event listener function. So now, when we test the movie, the sound is only going to play when the play button is clicked.

So now that we can play the sound, how do we stop it?
You can NOT stop the sound using the Sound class (e.g. Sound.stop(); will not work). Another class is used for that - the SoundChannel class - which has a stop() method that will let you stop a sound's playback.

Let's go ahead and create an instance of the SoundChannel class. I'm going to name it mySoundChannel.
var mySound:Sound = new Sound();
var myURL:URLRequest = new URLRequest("CheerfulSong.mp3");
var mySoundChannel:SoundChannel = new SoundChannel();

mySound.load(myURL);
We now have a SoundChannel object named mySoundChannel.

Think of the SoundChannel as the object that houses or contains your sound. In order to place a sound inside a SoundChannel, you assign the play sound statement to a SoundChannel like so:

SoundChannel = Sound.play();

So in our example, we would write:

mySoundChannel = mySound.play();

This assigns mySound.play() to mySoundChannel, so that the sound is going to play inside mySoundChannel. Let's go ahead and assign mySound.play() to mySoundChannel in our code:
var mySound:Sound = new Sound();
var myURL:URLRequest = new URLRequest("CheerfulSong.mp3");
var mySoundChannel:SoundChannel = new SoundChannel();

mySound.load(myURL);

play_btn.addEventListener(MouseEvent.CLICK, playSound);

function playSound(e:MouseEvent):void
{
     mySoundChannel = mySound.play();
}
So we've now assigned our sound to a channel. In order to stop the sound, then we'll have to stop the SoundChannel that contains the sound. We will use the stop() method of the SoundChannel class like so:

mySoundChannel.stop();

This will stop whatever sound that is playing inside the mySoundChannel object.

Let's put this stop statement inside a mouse click event handler for the stop button (stop_btn) so that our sound will stop playing when the user clicks on the stop button:
play_btn.addEventListener(MouseEvent.CLICK, playSound);
stop_btn.addEventListener(MouseEvent.CLICK, stopSound);

function playSound(e:MouseEvent):void
{
     mySoundChannel = mySound.play();
}

function stopSound(e:MouseEvent):void
{
     mySoundChannel.stop();
}
Here, we've created a mouse click event listener function named stopSound() for the stop button. This event listener function contains the mySoundChannel.stop(); statement. So now, the user can click on the stop button in order to stop the sound's playback.

NOTE: If you want to be able to play multiple sounds simultaneously and still be able to individually stop each sound, then you will need to create one SoundChannel for each sound.

Detecting when a Sound has Reached the End of Playback

In some cases, you might want to enable Flash to detect when a sound has finished playing. Let's say, for example, you have a song that's playing in the background, and you'd like Flash to display an image or a message only when the song has finished. To be able to detect when a sound file has reached the end, you can use the Event.SOUND_COMPLETE event of the SoundChannel class. This event gets dispatched once a sound file completes playback.

Let's go ahead and add an Event.SOUND_COMPLETE listener to our code. I'm first going to create the event listener function, which I will name endOfSound.
function playSound(e:MouseEvent):void
{
     mySoundChannel = mySound.play();
}

function stopSound(e:MouseEvent):void
{
     mySoundChannel.stop();
}

function endOfSound(e:Event):void
{
     trace("Sound playback is complete.")
}
Here, we have an event listener function named endOfSound. When this function gets called, it's going to trace a message to the Output window.

Now that we have this event listener function, we then need to add the event listener to our SoundChannel object. When you're adding an Event.SOUND_COMPLETE listener, the event listener must only be added AFTER the play sound statement has been assigned to a SoundChannel (i.e. after the SoundChannel = Sound.play(); statement). In our example, this line would be:

mySoundChannel = mySound.play();

And in our code, this line can be found inside the playSound event listener function. So we must add the event listener for Event.SOUND_COMPLETE right after that line:
function playSound(e:MouseEvent):void
{
     mySoundChannel = mySound.play();
     mySoundChannel.addEventListener(Event.SOUND_COMPLETE, endOfSound);
}

function stopSound(e:MouseEvent):void
{
     mySoundChannel.stop();
}

function endOfSound(e:Event):void
{
     trace("Sound playback is complete.")
}
Now that the event listener has been added, Flash can now detect when the sound has reached the end. If you test the movie now and play the song, the trace statement will output the message once the song reaches the end. So whatever other instructions you'd like to tell Flash to do once the song has reached the end (e.g. play another song, stop the animation, go to the next frame, display an image) should be placed inside the Event.SOUND_COMPLETE event listener function.

Stopping All Sounds at Once

If you have multiple sound clips playing at the same time, you can stop all of them at once by calling the stopAll() method of the SoundMixer class. In the example below, we have some code that stops all the sound clips that are currently playing, when a button is clicked:
// Assume that stopAll_btn is a button 
// that already exists on the stage
stopAll_btn.addEventListener(MouseEvent.CLICK, beQuiet);

function beQuiet(e:MouseEvent):void
{
     SoundMixer.stopAll();
}
Here, we've created a mouse click event handler that will enable the user to stop all sound clips that are currently playing by clicking on the button.

And those are the basics of how you can use the AS3 Sound class and the AS3 SoundChannel class in order to work with sound in Flash.


sumber: http://www.trainingtutorials101.com/2011/01/as3-sound.html

Baca Selengkapnya ....

Membuat Aplikasi Tanggal & Waktu dengan ActionScript 3.0

بِسْــــــــــــــــمِ اﷲِالرَّحْمَنِ اارَّحِيم

Posted by Unknown Minggu, 05 Agustus 2012 0 komentar
Membuat Aplikasi Tanggal & Waktu dengan ActionScript 3.0 | Belajar Dasar Flash AS 3
Adobe Flash versi terbaru yaitu Adobe Flash CS5 dengan ActionScriptnya mampu membuat beberapa aplikasi-aplikasi yang sangat mengesankan, tidak jarang para pengembang sekarang ini memanfaatkannya untuk keperluan aplikasi dan juga game. Game-game yang terdapat di Facebook itu adalah salah satu aplikasi game yang di rancang dengan menggunakan Flash ActionScript.
Nah disini kita akan mencoba untuk menampilkan tanggal dan waktu sekarang pada Adobe Flash CS5 dengan menggunakan ActionScript 3.0. Berikut adalah langkah-langkahnya.
Buat file flash baru. Kemudian atur ukuran Stage pada Properties dengan 300 x 180.
Klik Text Tool (T) pada Toolbox, lalu buat Type Text=Dynamic Text, jenis Font=Arial, Size=32, Color=hitam. Buat teks pada Stage seperti gambar berikut.
Membuat Aplikasi Tanggal & Waktu dengan ActionScript 3.0
Pada Properties, pada Instance Name beri nama ”txtHrs”. Buat dua Dynamic Text lagi dengan pengaturan text seperti text diatas, posisikan seperti gambar berikut dan beri nama pada Instance Name seperti berikut.
Membuat Aplikasi Tanggal & Waktu dengan ActionScript 3.0
Buat text tanda ”:” dan posisikan diantara ketiga text diatas.
Membuat Aplikasi Tanggal & Waktu dengan ActionScript 3.0
Selanjutnya kita akan membuat text untuk tanggalnya, dengan Text Tool (T), buat Dynamic Text dengan Font=Arial, Size=24, Color=hitam. Beri nama pada Instance name dengan ”txtDate”, posisikan seperti pada gambar berikut.
Membuat Aplikasi Tanggal & Waktu dengan ActionScript 3.0
Beralih ke Timeline, klik di Frame 1 lalu buka panel Action (F9) untuk menuliskan script-script untuk menampilkan waktu dan tanggal. Tuliskan script berikut.
var tm:Timer = new Timer(10);
tm.addEventListener(TimerEvent.TIMER, update);
function update(tevt:TimerEvent):void {
var now:Date = new Date();
var hr:Number = now.hours;
var min:Number = now.minutes;
var sec:Number = now.seconds;
if (hr > 12) {
hr -= 12;
}
if (hr == 0) {
hr = 12;
}
txtHrs.text = String(hr);
if (min < 10) {
txtMins.text = "0";
}
else {
txtMins.text = "";
}
txtMins.appendText(String(min));
if (sec < 10) {
txtSecs.text = "0";
}
else {
txtSecs.text = "";
}
txtSecs.appendText(String(sec));
txtDate.text = now.toDateString();
}
tm.start();

Tekan tombol Ctrl + Enter untuk melihat hasilnya. Simpan pekerjaan Anda.

Artikel cinta fido ini tentang Membuat Aplikasi Tanggal & Waktu dengan ActionScript 3.0

Baca Selengkapnya ....
Panduan blog dan SEO support Online Skill - Cinta fido Fido | Kopi kanan Akherat | Kisah Nabi Muhammad | Sahabat | Belajar Blogger | Template | HTML | Tutorial | Komputer.

investasi semoga anda senang

kurs mata uang BCA-2


Selamat datang di blog cinta fido, semoga anda diberi keSehatan oleh alloh SWT

Islam itu Cinta Damai Agama Islam Cinta Damai
jihad Damai adalah amal kebaikan yang Allah perintahkan dan menjadi sebab kokoh dan kemuliaan umat islam